Thursday 28 December 2017

Virtual Jam blog 3 / BitIO blog 8:Space themed Minecraft project ideas using the accelerometer


Space themed Virtual Jam / BitIO blog 8: 'Simple Space exploration with a Micro:bit'


As part of YorkPiJam's virtual Jam last weekend there was a Minecraft coding competition to go along side the any other project compeition, the theme this time is Space. Here are a couple of simple project ideas from students at my Schools Minecraft Pi club. First of all to you will need to read this blog about how to get started using BitIO(Made by David Whale).
http://warksjammy.blogspot.co.uk/2017/07/blog-1-getting-started-with-bitio.html


Both projects are based on one of the demos provided in David's demos. Students at my school have modified it slightly. The first project 'Solar Tilt' allows you t explore a simple representation of the Solar System by tilting the accelerometer. You can see a photo below. You will need to research and build this in Minecraft (Pi or Java version).


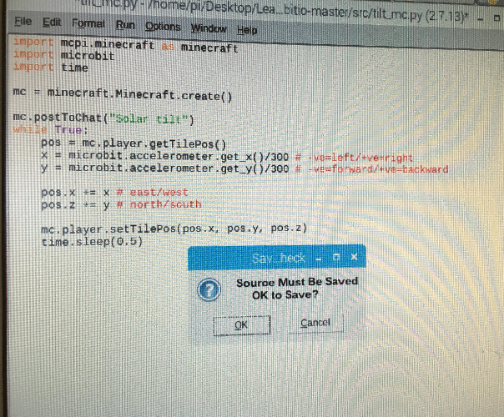
Micro:bit Solar tilt(modified by Adrian in year 9):

Screen shot in action:


Screenshot of code:


The second project 'Accelerometer Orbit'

This project uses essentially the same mechanics of the demo but drops a block on ecah movement which will allow you to create a cool looking orbit / ring around the object / planet that you build in Minecraft. Josh in year 7 built an alien for example. 

Screenshot of code in action:


Screen shot of code:

Both of these students have made minor modifiactions to David's base code but even with this there is unlimited potential you use the basic accelerometer example. Why not build a city and explore it.

Both these projects won prizes as part of @yorkpijam's virtual jam last weekend.


Enjoy,


Chris Penn.


....


Friday 15 December 2017

M:EE MakeCode blog 6: My first Mini Game

M:EE MakeCode blog 6: My first Mini Game

In this mini game you will:
  • Learn to use variables
  • Incrementing variables
  • Triggering events with commands
  • Concatenating variables and string message  

Step 1: The aim of the game is that you type in type in the folowing into chat 'Start game'

Step 2: A Blaze will apppear 10 blocks in front of you. You need to kill it and for each Blaze that you kill it will increase your points by one. Each time you achieve this a message will be displayed that says you current score.

Step 3: Finally a new Blaze will spawn and this continues indefinetly.
Extension: Can you add code that turns the game off. 

Here is the Mini game in action:
Whack the Blaze....

Earning points.....

Code....

Enjoy!

Chris Penn


M:EE MakeCode blog 5: Vertical farming


M:EE MakeCode blog 5: Vertical farming


Is it possible to spawn several different farm animals vertically everytime your character walks............in a nutshell yes see below:


but it gets messy quickly.......

Here is the code:

Over,


 Chris Penn


Wednesday 13 December 2017

M:EE MakeCode blog 4 "Wool Wall"


M:EE MakeCode blog 4 "Wool Wall"

This takes the code from blog  3 and extends it through using variables and loops  to repeat instructions and create a wool wall. You can interact with the code here:
https://makecode.com/_gwz8jKgsbFdD
 (See below):


Here is the code:


Here is the JavaScript code that it generates:
let Count = 0
let Rows = 0
player.onChat("wall", function () {
Rows = 20
Count = 0
    for (let i = 0; i < Rows; i++) {
        blocks.place(blocks.block(Block.LimeWool), positions.create(-3, Count, 10))
        blocks.place(blocks.block(Block.Wool), positions.create(-2, Count, 10))
        blocks.place(blocks.block(Block.OrangeWool), positions.create(-1, Count, 10))
        blocks.place(blocks.block(Block.MagentaWool), positions.create(0, Count, 10))
        blocks.place(blocks.block(Block.LightBlueWool), positions.create(1, Count, 10))
        blocks.place(blocks.block(Block.YellowWool), positions.create(2, Count, 10))
        blocks.place(blocks.block(Block.PinkWool), positions.create(3, Count, 10))
Count += 1
    }
})


Tuesday 12 December 2017

M:EE Make Code blog 3: Rainbow Road

M:EE Make Code Blog 3: Rainbow Road


This builds in from blog 2 which was laying one block underneath the player. Then another block undereneath that. It ends up lookng like this:


This blog builds on from that and lays a Rainbow road spanning across from right to left from the centre of the players position. The code looks like this:


Points to not the first coordinates are x they are the blocks left to right of the player. Pink is directly where the player is set x-1 is left one block and so on. X +1 is one to the right of the player. Furthermore the second cooordinates Y are all -1as they are all set to 1 below the player.

Here is what your output looks like:


Thats it! well done you have extended your code to walk in colourful style.


Over.

Chris Penn


M:EE Make Code blog 2: Get coding.

M:EE Make Code blog 2: Get coding.


This first real coding in Minecraft is usually walking blocks, so lets see how you would achieve this with Make Code.

Step 1: Ensure you have followed blog 1. link:

Step 2: Drag in the 'On Chat' command from 'Player' menu on the left.  

 
Step 3: From the 'Blocks' menu drag in the 'Place' command. Using the drop down list chose the block that you want to drop. By changing the middle 'Y' value you can lay blocks blow Alex. -1 is one block below and -2 one below that and so on.

Step 4: Repeat this with as many further blocks as you wish I did another block.

Step 5: In the 'On Chat' block type in 'Set', this will act at the trigger to launch the code in game.

Step 6: Click on the button in Make code that is a red square in picture above it should be a Green this will start off the command.

Step 7: Go back to  M:EE and press 't' on the keyboard, then type in 'Set' you should see blocks appear beneath your character (see below).

 
Extension: Walking blocks.......

Step 1: Remove the 'On Chat' command.

Step 2: Replace it with 'Forever' loop from 'Loops' menu

Step 3: Add in a time delay from the 'GamePlay' menu.

Step 4: Try rerunning your code by click on the Green/Red button. You should end up with this code:


And this output:


Well done! you have completed your first mod in M:EE.


M:EE Make Code blog 1: Getting started.


Getting started with Make Code and Minecraft: Education Edition.


Step 1: Log in launch M:EE you will need a valid log in.


Step 2: Once you have validated your log in then select play. 


Step 2: Load up a new world, or use an existing one.


Step 3: Load the Code Connection app. See below:


Step 4: Load up the Make code on website https://minecraft.makecode.com/ and open new project. This step may not be needed but was the only way I have found so far to get Make Code to launch.


Step 5: Switch to the Code Connection app and copy the IP address.  


Step 6: In M:EE press 't' on the keyboard to open chat, paste in the server address by pressing control v. Press enter to execute. 

Step 7: Then this should load....

However I found it to be a little bit hit and miss so you may need to try a few times. This might just be my isolated experience.

Step 8: Chose which ap you would like to use I chose Make Code. This should then appear on the left half of the screen like thus with M:EE on the right.

Step 9: See the next blog for your first coding adventure.
Step 10

Monday 4 December 2017

MEE blog 3: Experiments with more simple command blocks.


Command Block:

This third one is yet more Command block controls. This time it includes:
  • Giving inventory(cake)
  • Changing the weather and clearing it.


Step 1: Load a new game and enable cheats before the world loads. Select 't' on the keyboard and type in the below command to allocate a command block in your inventory.


Step 2: Select 't' on the keyboard and type in the below command to allocate a button stone or wooden in your inventory.


Step 3:  Press crouch(shift) and place a button down on top of the command block.


Step 4: Give me cake.


Step 5: Controlling the weather.


Sunday 3 December 2017

Minecraft Education Edition Blog 2: Summon Ed


Command Block: Summon Ed.......

Second one is still simple as I am new to all this Command block stuff. This time we shall summon some cool stuff.


Step 1: Load a new game and enable cheats before the world loads. Select 't' on the keyboard and type in the below command to allocate a command block in your inventory.


Step 2: Select 't' on the keyboard and type in the below command to allocate a button stone or wooden in your inventory.


Step 3:  Put a button down and command block.


Beefy....


Step 4: Right click on command block and type in the following instructions.


Step 5: Whack the button by clicking the right button on the mouse. You should see your newest pet appear, lets call her 'beefy'.


Now try these out......


Ed....


Step 6: Right click on command block and type in the following instructions.

Step 7: Whack the button by clicking the right button on the mouse. You should see your newest pet appear, lets call her 'Ed'. What do you notice happens when Ed is summoned?


Chick, chick, chicken....


Step 8: Right click on command block and type in the following instructions.


Step 9: Whack the button by clicking the right button on the mouse. You should see your newest pets appear. I got a little trigger happy.


Over.